Wednesday, October 3, 2012

Ice Painting

I'm excited because this is the first post I've done for the "Craft Rooms" part of the title of my blog.  Then again, you could also say I was teaching my little girl something about ice, but let's just stick with the story that I was letting her be crafty and creative...

I decided to link up to my friend Vanessa from See Vanessa Craft's Tot School Tuesday linky party (please do not notice that it is Wednesday).  


In the interest of finally just getting this post out there I woke up early on a SCHOOL day (GASP!) to type it up, so I'm going to let the pictures do most of the talking for me.

To do ice painting, you need very little in the way of materials.  I bought powdered tempera paint from my local teacher store.  I let Afton pick the color and she picked red, most likely because in powdered form it looks pink.  This was my first experience with powdered paint.  You also need paper and ice.  For the ice, you could just use an ice cube in which you froze a popsicle stick.  Or, if you happen to have a Mickey Mouse popsicle maker like me, you could freeze water in that.


We did this activity outside (strong recommendation).  I sprinkled some paint on the paper and let Afton get started:


Afton enjoyed painting, but probably not quite as much as she did sucking on the last (paint-free) ice pop!

That paint really is amazing because the instant it touches water it becomes bright (blood) red!  The clean-up was not bad since it was outside and I could just spray off with a hose.  Afton wasn't that messy and what paint she did get on her washed off.  

There are many ways to could alter this activity.  While she was painting, I thought hey-why couldn't I just have used the powdered form of Kool-Aid?  Then it would be edible ice painting!  I also think you could go ahead and make the paint, freeze it, then paint with it.  And how exciting would it be to have two or more powders on your paper to mix up with the ice!  That would be awesome for observing the results of color combinations!  Feel free to add any more ideas in the comments.  I love open-ended activities!

Go out and do this with your tots before it gets too cold!  

Until next time,


Tuesday, September 25, 2012

Lois Ehlert Book Study and Art Activity

Ha ha ha!  I'm breaking away from my incessant toils to write a post that is exactly 9 days overdue!  The fact that I'm not grading or planning or prepping somehow makes me feel almost naughty, like I'm a student skipping out on Senior Skip Day.

As mentioned in a previous post, I was knocked out of my blog funk by an event hosted by The Educator's Spin on It called the Virtual Book Club for Kids:


I figured if I could blog even just once a month it would be an improvement.  
So, even though I am 9 days late, here I am!  

This month's featured author was Lois Ehlert.  My children at home and the students in my classroom have thoroughly enjoyed this study.  I checked oodles of her books out of the library and spent many nights reading them to my kids.  After we finished, I put them in my classroom library for my students to love on.  I really think my students could now identify an Ehlert book by its illustrations from a mile away!  We used the book Feathers for Lunch to practice identifying key details in stories.  The greatest thing we did with an Ehlert book, and the focus of this post, was the language arts and math integrated art project using Ehlert's Oodles of Animals


We spent several days enjoying the quirky, fun poems and exploring the rhymes in the book.  Then we turned our focus to the illustrations.  In the back of the book, in very small print, the author discloses that she used nine shapes to complete the animal illustrations on each page.  We had so much fun finding the nine shapes on each spread!  I just knew we had to extend it further, and an art project was born!

The students cut shapes out of colored paper to create illustrations of animals just like Lois Ehlert!  I created this checklist for the kids to use to make sure that they used all nine pieces in their pictures:


You can download it free at my TpT store here.  It really helped some children.  I also learned who needs help using checklists!  

Then I prepared the supplies.  I laid out a rainbow of construction paper and some scrap paper that the students could use.  


To help create the shapes, each student had a pattern block template (from our old Everyday Math curriculum) that had some small shapes on it that the students could trace.  For shapes that weren't on the template, and to give more size options for the ones that were, I laid out a variety of things the students could use to trace.  I had to get creative for some options and used cookie cutters for hearts, circles and ovals.  I also taught them how to make an oval out of two circles.  Our awesome math coach made a template for tear drops.  Then, my students started finding objects around the room that they could use (hence the Clorox wipe bottle--love it!).

I also included dot stickers and those donut-looking stickers you use to reinforce holes (what are they called?) because many of the eyes of the animals in Ehlert's book looked as if they had been created with these.  Finally, I included hole punches and crinkle-cut scissors.


The punches and scissors were a huge hit!  The rule was to use one tool at a time, and return it when finished.  Once the directions were given, students were set free to create!  The activity took way more time to complete than I anticipated, but I didn't care.  The students were so engaged and involved in their pictures that they DIDN'T TALK.  They cooperated with each other.  They thought outside the box.  It was one of those moments as a teacher you just SOAK UP.  And take pictures:

Getting started

Tracing

Cutting

Referring to the book for help

This girl decided to use the pattern blocks to plan out her work.  Wow!

This boy was obsessed with the hole punch

See his porcupine? It's a pile of holes glued together!

Ahhh...the sight of kids engaged is a beautiful thing.

Getting some work done!


One of the things we noticed about Lois Ehlert is that her illustrations usually have labels on them.  On the following school day, I gave each student a Post-it and asked him or her to spell the name of their animal.  I then conferenced with each one, showing them how well they had heard the sounds in the words.  Finally, I gave them a sentence strip and had them copy the correct spelling on it and glue it on their picture to label it.  We are going to bind the pictures into a book.  The students decided to call it Millions of Animals.  Here are some work samples:

I like how she added a sound word...


Betcha can't guess who did this fabulous owl!


Overall, this project was a ton of fun!  I can't wait until next month's book study!


Saturday, September 22, 2012

Crazy Week and a Surprise


It has been a long week!  I had three morning meetings which means I only had two one-hour planning mornings (my only planning time at school) and my evenings were spent prepping, grading, getting interims finished and of course, playing with my kids.  Whew.  For the first time, one of my students asked if the Kindergarten teachers are teaching Physical Education and Music, also.  I guess he thought this was just a first grade thing.  Sorry honey, all the teachers are doing it this year.  But I'd like to think I'm giving it my best effort!

The surprising thing this week was that I kept looking so forward to the time when I would get to blog again.  It's almost as if it is my release!  I definitely should try to do it more often, when I don't have weeks like this one.  And I have a smattering of new followers--here's to you!  Thanks for reading!  

I have two more posts planned for this weekend, activities that I completed in the past week to link up to other blogs.  I have my monthly world travel-themed date night tonight with the hubby.  It's part of my birthday present for him--a year's worth of dates.  We've been to Hawaii (drinks on a beach) and France (dessert at That Crepe Place) and tonight we are traveling to Australia (going to Outback--shhhh, don't tell him!).  I'll get the pictures edited and blog posts up sometime this weekend!  


Saturday, September 8, 2012

"Owl"standing Work Board and my FIRST FREEBIE!!!

In college I found a book that became my favorite children's book and a first day must-read to every class I have had.  It's not the traditional back-to-school book, but I love it because of the message it sends to my students and because it serves as a reminder to myself of the kind of teacher I yearn to be.  


The Dot by Peter H. Reynolds is a story about a little girl named Vashti.  In the beginning of the story, Vashti is troubled and frustrated.  Art class is nearly over and her paper is blank because she believes that she can't draw.  Vashti's teacher encourages her humorously to at least put a dot on the paper and then to sign it.  The next day, Vashti returns to class to find that the teacher has posted her artwork above her desk in a swirly gold frame.  Inspired, Vashti sets out to make even better dots, and by the end of the story is confident enough to encourage others in the same manner in which she had been inspired.

I love this story because it encourages students to at least try, even when they think something is too hard.  I especially love the role the teacher plays in the story, and I'd like to think that I have affected some of my students similarly throughout the years.  

Here's how I've incorporated the story into my classroom this year.  Last winter, during the holidays, I found this at my local JCPenney store:


Fred & Friends Mealtime Masterpiece Placemats


This is just a pad of paper but each page looks like a swirly gold picture frame. I bought it and knew just what to do with it in my classroom!

Now, remember, my room is all owlicious this year:


So, I created a space where I can hang my students' work in such a way that they, too, could be inspired.  I call it my "Owl"standing Work area! 

Forgive the ugly yellow tile work.  It comes with the ancient building.
Another view:


Each student has a laminated frame and can hang their graded work on it here in the hallway for all to see.  I am making each student responsible for choosing what goes onto the frame.  I want to make sure students aren't choosing things just because of the grade they got. Therefore, I have created an "Owl"standing Work Application.  


When a student decides that a graded, returned paper or art piece is worthy of the wall they must fill out an application.  Really, it's a chance for the student to tell me what they have learned in the piece.  The application is going to be my first FREEBIE!  Click here to download it from my new TpT store!  I hope you can use the story and my ideas to inspire students in your classroom!

Friday, September 7, 2012

Extreme Curriculum Mapping

Wow.  The weather has been absolutely humid, hot and miserable this week.  In an old school with no air conditioning this is a recipe for restless children and a teacher that is beyond ready for the weekend!

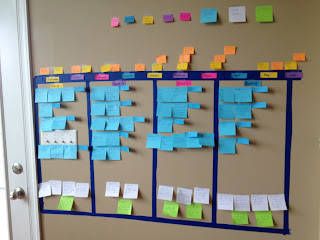
Last weekend I worked really hard mapping out my new Math and Language Arts curriculums to try to figure out what the heck I am supposed to be teaching.  I learned that apparently I am a hands-on/ visual learner.  First, I wrote all of the standards out on color-coded Post-it notes:


Then, I quite literally taped a grid onto my wall and started sticking the standards where the curriculum recommended they should be. 


Here's a closer picture:


You can see the Post-its for months, quarters, days off and the stickers that were the "keys" for the subject area colors.  I am such a nerd!

The good news is that it helped--a little.  I have a much better grasp of this quarter and a fairly good idea of what direction to go in.  The bad news is that this map needs to stay up all year.  Ha!  I still inexplicably feel like a brand new teacher even though this is my fourth year teaching first grade! I need to figure out the "how" now that I've got the "what". 

This weekend I would like to finish the quilt I bought and started for my son before he was born.  Over a year ago.  Instead, I think it's going to go more along the lines of something like this: 


Saturday, September 1, 2012

Life Happened...but Then???

Wow!  It's been almost a year since I last posted.  I was in the middle of my maternity leave after having my Little Man.  I had such high hopes for myself and really wanted to have a go in the blogging world, but then life happened.

Any teacher can sympathize with someone who misses the first six weeks of the school year due to maternity leave.  That critical impression period has come and gone, and no matter how well the substitute did with them it's just not YOUR way.  For the first time, I felt like the new kid in my own classroom.  Every day was a struggle, not because of the kids, but because I couldn't ever catch up.  EVER.  I thank God that my class was small (only 14 darlings!) and that I had the support of my family to make it through.
Then summer happened.  Our two-week family vacation started the day after Teacher Work Day.  No breathers!  It was nice starting the summer like that, but again--crazy!  When I got home I didn't want to think about school.  I had household things that had been lacking attention for months that I needed to tend to and I just wanted to soak up time with my kids and hubby.

Just about the time that I felt like maybe I should go ahead and read the CAFE and Guided Math books I got to study over the summer, we went on another SURPRISE vacation to celebrate my hubby's 30th!  I got a lot of reading done on that road trip, but it was no books that would help me in the classroom, that's for sure!

By the time we got back and unpacked again summer was winding down.  Then I was in panic mode!  I started burning up my Pinterest boards with awesome school ideas.  I redid my classroom in a fabulous owl theme. I started a MASSIVE project that I had been meaning to do for years in my classroom--and then I got a great idea for my blog!  It was perfect!  I was passionate about it!  It could help others!  It...............never happened.  :-(

Before I knew it I was back to school at teacher meetings, coming home and crying because I have brand new Math and Language Arts curriculums to go with the brand new Common Core State Standards and I need a whole SUMMER just to figure out what to do with them but no, I met my new huge class of babies on Monday this week.  They're here and ready for me to be fabulous and I'm trying.  Life happened again.  I gave up on my idea.  Pushed it away for another year.

But then...tonight as I was skimming Pinterest instead of mapping out my curriculum, I came across this:

Picture courtesy of http://theeducatorsspinonit.blogspot.com
What a fabulous idea!  The authors of The Educators' Spin on It have teamed up with other bloggers to create an online book club.  They chose 12 kid's book authors, one per month, and are hosting a linky party where participants can link up activities to go along with books written by the featured authors.

My great blog idea had to do with my classroom library.  I have been re-inspired by this project!  This is something fun I could, at the very least, do with my kids at home but probably expand it to my Firsties, too (if I can fit it into my new curriculum).  It's once a month.  I can handle that!  If I can handle that, then MAYBE I can squeeze in a few posts that have to do with my idea!  

I can do this.  I CAN do this.  I CAN DO THIS!  I find myself thinking this almost every day now.  If I keep at it, it will materialize!  Wish me luck!


By the way, I'm still "new" at this, so if I didn't link something up or reference something correctly, please inform me!


Wednesday, September 21, 2011

DIY Felt Board

For today's post I decided to share a project that I completed a few weeks ago. I have been getting a lot of great ideas from Pinterest lately but I am proud to say this is something I came up with all on my own! I'm sure it's been done before, but this is such a perfect addition to a home or a classroom it's worth revisiting.

We threw a "Meet the Baby" celebration a few weeks ago and one of the things I wanted to do before people came over was finally hang up the many pictures and frames we have had laying around since we moved and our daughter was born. Here's how it turned out (sorry for the picture quality, they were taken on my iPhone--I'm working on taking better pictures for blogging):

Did you spot the one that isn't quite right? I've been meaning to fix it. I won't even tell you about the huge hole I put in the wall and the pipe I hit while putting these up.

So anyway, I had a large 24"x36" frame left over from a project I never completed. I was cleaning up Afton's felt board pieces she had been playing with and I began to wish she had a large play surface to hang them up and play on. Then, the bells went off! I could make the frame into a felt board! I went to the fabric store and bought a yard of black felt. This ended up being more than I needed because apparently felt comes WAY wider than I am used to. That's fine, though, because I had a coupon and only paid $2.19 for all of it. I'll have left overs for other projects.

Next, Dustin cut a piece of cardboard the size of a picture that would fit in the frame. He actually used the backing of the frame to trace onto the cardboard. I cut the felt using the cardboard as a guide. I left an extra inch to overlap on each side. Then I wrapped the felt over the front of the cardboard. I used a glue stick on the cardboard to help keep the felt flat. I would've used some spray adhesive if I had it, but this has held up well so far. I used my regular old office stapler to staple the felt to the cardboard. Here's a tip--staple as close to the edge of the cardboard as you can, otherwise the staples will show once it is in the frame. Finally I put the felt into the frame (no glass needed) and hung it on the wall!

There are so many felt board projects I want to do for the kids! The teacher in me wants to get a calendar felt set to start talking about numbers and weather each day with Afton. I also want to cut pumpkin shapes and various eyes, nose and mouth pieces out of the black felt for some seasonal pumpkin decorating fun. So far, the only thing I have done is used cookie cutters to trace simple shapes onto red and white felt. I cut them out and used them to entertain Aiden:

By the way, Afton's favorite felt board activity is tearing all of the pieces off of the board and leaving them in a pile on the floor. Good times.